661 Planting Trees,
Shrubs, and Vines
Description (661.01)
This item of work involves
furnishing plantings (trees, shrubs, vines and other materials) and planting
them according to the plan details, these specification requirements and
applicable Standard Construction Drawings.
Labeling (661.05)
All plantings delivered to
the project must have legible labels which indicate detailed information of the
botanical genus and species name, the common name, the size, or age of each
plant variety. The labeling must state
the quantity in the individual bundles, boxes, and bales. These labels must be removed before the
completion of the establishment period.
Acceptance (661.06)
General Appearance
The general appearance of a
plant is the quickest way to judge its health and vigor. Be sure that the
plant:
·
Is healthy,
typical of their species or variety, and have a normal growth habit.
·
Meets the minimum
dimensions given in the General Notes.
·
Container is not
cracked or severely dented.
·
Container is weed
free.
·
Is generally
symmetrical with no large gaps in the branching structure.
·
Has
no broken limbs.
·
Is free of
excessive bark damage.
The foliage of the plant should be:
·
Erect and firm
(except for weeping type plants).
·
A uniform green
color (except for fall color).
·
Vigorous,
healthy, and robust.
·
Free of wilting,
yellowing, and browning.
Note: Inspection of the
plants before unloading from truck will save time and effort. Plants do not
need to be individually inspected; a random inspection will be ok. The source
of supply should be verified from the shipping ticket and compared to the plant
material list (C&MS 661.03) as submitted earlier. Plants that do not meet
specifications or differ in source of supply is
justification for non-acceptance.
Problem Signs
Substantial amounts of brown
or yellow foliage indicate the plant may be experiencing stress or shock. (Be
aware that some trees, depending on whether they are deciduous or evergreen,
may change color during the fall.)
Wilted foliage probably
indicates a lack of water during shipping or storage. All plants must be
completely covered during shipping (C&MS 661.04). A thorough watering should restore the
foliage to a healthy appearance within a couple of days. If not, the plant
should be monitored for a few more days to see if it recovers before planting.
If the condition does not improve, reject the plant. Broken and dead limbs
indicate poor growing or handling conditions.
Testing for Dead Plants or Limbs
It is not always easy to tell
if a plant is alive, particularly during the winter if the plant is a deciduous
variety and has shed its leaves. Some of the techniques listed below will help
to determine if a plant or a part of the plant is alive.
·
Using your
fingernail, pocket knife, or other sharp object to scratch the bark on the
trunk or limbs. A living plant will be light-green and moist just below the soft
bark. If the bark is hard and the scar is brown, that part of the plant is
dead. A random check of other areas will help to determine if the plant is
vigorous and healthy.
·
Wrinkled bark
that is off-color is an easy visual clue to dead parts of a plant.
·
Healthy limbs are
flexible. They can be bent without breaking. Dead limbs are dry and brittle.
Container Grown Plants
The roots of a container
grown plant should:
·
Be growing
throughout the growing medium.
·
Bind all the soil
together.
·
Be white in color
and moist; dark brown or blue black roots indicate damaged or dead roots.
Test for adequate root
system: Inspecting the root systems of
plants is very important. It is not necessary to test all the plants;
random checks will be sufficient if all the plants are from the same grower. If
the plants are provided from more than one supplier or grower, be sure to
random-check each group. Also, inspect any plants that appear different or out
of character with a group of like plants.
·
For shrubs, hold
the plant at the base of the trunk and gently lift the plant a few inches out
of the container. If the entire contents of the container move and hold its
shape in a firm mass of roots, the plant is properly "rooted-out" and
ready for planting.
·
For trees, lay
the container on its side. Hold the tree at the base of the trunk as close to
the soil level as possible and gently slide the tree from the container a few
inches. If soil is left in the container or if the root system is not growing
throughout the entire container, the plant is not ready for planting and should
be considered for rejection.
This method is not possible
for large trees. Instead, dig 2 to 3 inches into the soil at the very edge of
the container and look for a firm mass of small roots.
Root-Bound Container Plants
If plants have been growing
in their container for a long time, the roots will wrap around the inside of
the container. These roots need to be cut or sliced prior to planting. These
cuts should be made along the sides and bottom. Cutting these circling roots
will enable the plant to produce new root offshoots and grow without problems.
Checking Container Sizes
The size of large plastic
containers may be indicated on the handle. Since these are nominal volume sizes
only, there may be some variation in actual size, even though the containers
from two different growers are labeled as being the same volume. Refer to
Appendix for the minimum acceptable size ranges for containers without sizes
printed on them or for wooden or metal containers.
Soil Condition in Containers
Check for the following soil
conditions:
·
The soil level
should be within a couple of inches of the top of the container. It should be a
light (by weight) soil mix of mostly bark mulch and perlite or vermiculite
(small white or silver particles that help hold water).
·
If you see clay,
burlap, or wire in what is supposed to be a container grown plant, inspect
closer to determine if the plant has been dug from the field and then placed in
the container. The root development test described previously should determine
this. A containerized plant in lieu of a container grown plant is not
acceptable and must be rejected.
B&B Plants (Balled & Burlapped)
Inspect the rootball of B&B material for:
·
A firm, tight
ball with no roots protruding outside the wrapping.
·
Wrapping that is
snug and free of rips and holes.
·
Cracked balls or
balls that are soft and look like a bean bag (these should be rejected).
·
Damage to the
base of the trunk caused by wire or string used to secure the wrapping moist
soil.
Soil Condition of the Rootball
The soil in a B&B rootball will almost always be clay or tight, sandy clay.
This is necessary so that the soil will hold its shape during digging, as well
as hold water during shipping and storage. Rootballs
that are mostly sand may crack and break easily, possibly exposing roots to
heat and dry air. Plants with a sand rootball should
not be accepted. The rootball must be moist and
shaded for protection at all times when shipping or storing.
Measuring Caliper
This is measured 6 inches
above the ground (or top of rootball) up to and
including 4-inch caliper size and 12 inches above the ground for larger sizes.
Measurement should be taken with pincher type caliper or diameter tape.
Proper Habit of Growth
If a particular habit (e.g.,
single stem, multiple stem, etc.) has been specified, be sure to obtain plants
that conform to this requirement. Height of branching should bear a
relationship to the size and kind of tree, plus, the crown of the tree will be
in good balance with the trunk as the tree grows. For example, 2-inch caliper =
12 to 14 feet average height; 16 feet maximum height.
Shade and flowering trees
should have top growth symmetrically balanced. Shade trees should have a single
leader. The branching should be well developed and characteristic of the
species. For example, 3/4-inch caliper = 7 or more branches.
Multi-stem trees can be
defined as clump or shrub form. Clump form is a tree which has two or more main
stems arising from the root crown. Shrub form has multiple stems arising from
the root crown in the manner of a shrub. Multi-stem trees are measured by
height, taken from the ground level (or top of root ball) to the average
uppermost point of growth of the plant.
Evergreen trees and shrubs
should be full foliaged plants with uniform density. Sheared plants, such as
pines sheared for Christmas trees, must be avoided unless specified. Most
evergreen shrubs, such as juniper and yew, are measured by spread and should be
the plant average. Evergreen trees like pines and spruces are measured by their
height.
Deciduous shrubs should be
well branched and full with no large holes from missing branches. Most are
broad, upright type plants and are measured by their height. Well grown material should have a height
equal to, if not greater than, the spread. However, the spread should not be
less than two-thirds of the height.
Rejected Plants
Plants rejected for the
project should be removed as soon as possible. They should be marked to
preclude the possibility of their installation on the job. Since discarded
plants are the property of the Contractor, they should not be marked or
mistreated in such a way as to make them unfit for other uses.
Insects
Do not allow the Contractors
to deliver any plants to the site that are infested with harmful insects.
Harmful insects are those that eat or bore into the plant including:
·
Caterpillars
·
Borers
·
Aphids
·
Scale
·
Mealy bugs
·
Bagworms
When inspecting for insects,
look for:
·
The insects
themselves. Most insects that suck plant juices usually do so from the
undersides of leaves, particularly tender new leaves. Be sure to check these
areas for aphids and mealy bugs.
·
Leaves that have
holes or portions chewed out of their margin. Typically caused by caterpillars.
·
Small bag-like structures
hanging from limbs. Typically an indication of bagworms.
·
Holes in the bark
that looks like shotgun holes. Typically a result of borers.
·
Discolored bumps
along a stem that look like shells. Typically an indication of scales.
Beneficial insects include
lady bugs and butterflies. If insects are found, and it is unknown whether they
are harmful or beneficial, the Inspector can call the local County Extension
Office.
Table 661.A – Plant Damage
- Trees and Shrubs
|
Things To Look For |
What It Means |
Action To Take |
|
Minor amounts of breakage of small, twiggy growth. |
Normal shipping damage. Should not be excessive. |
Damaged twigs should be not be pruned. |
|
Many small limbs broken. |
Poor handling. Should not be excessive. |
Broken limbs should be pruned. Reject if breakage is excessive. |
|
Minor amounts of nicks and scratches. |
Normal shipping damage. Should not be excessive. |
None. |
|
Gashes in trunk that are 1/8 (0.3 mm) deep or less and less than 1 inch (2.5cm) long. |
Poor handling. Should not be excessive. |
Treat with pruning paint. Reject if damage is excessive. |
|
Gashes longer and deeper than the above. |
Excessive damage. May stress plant and lead to loss of plant |
Reject the plant. |
|
Broken limbs 3/8 inch (l cm) in diameter or larger. |
Poor handling. Damage done to larger limbs is more critical. |
Broken limbs should be pruned. Reject if major limb or more than one. |
|
Central leader (main trunk) is broken or cut. |
Poor care or may have been pruned to meet specifications. |
Reject the plant. |
|
Limb partially broken or cut and has to be wrapped or repaired. |
Someone tried to repair evidence of poor handling. |
Reject the plant. |
Inspection during Planting
The purpose of this part is to
serve as a guide for an inspector who may not have the experience to determine
that planting operations at the construction site are being properly completed
in conformance with contract plans and specifications and good horticultural
practices.
Planting stock should be
inspected upon delivery. This will ensure that the plants delivered meet the
requirements of the contract planting plans and specifications.
If plants are delivered
before the site is ready for planting, a location should be chosen to store the
plants until time to plant. This site should be away from construction traffic
and protected from direct sun and wind. Asphalt or concrete areas are not
acceptable as storage locations. Plant rootballs
should be covered entirely with mulch, approximately 3 inches deep. Plants
should be watered as necessary (see watering table) while in this temporary
location.
Planting (661.10)
Unless in conflict with the
contract specifications, the following check list of horticultural practices
may be used by the Inspector. This information pertains to new or replacement
nursery stock and not to large, mature plants.
1. Plantings should be performed only during the
specified planting season (see C&MS 661.07).
Planting must be done between September 15 and June 1.
2. The Inspector should check for proper positioning of
the plants. After plants are set, burlap and any twine should be loosened, laid
back, and cut away if bulky, without damaging the ball. Non-biodegradable
materials should not be used in lieu of burlap.
3. Check for correct depth of the plant crown. Depth of
crown will vary for different soil conditions. See SCD
LA-1.2 for details.
4. Place approved backfill material around plant roots or
plant balls. Be careful not to damage the ball or the fine root system.
Backfill which is frozen or too wet is not acceptable.
5. Eliminate air pockets in the backfill by filling,
tamping, and watering as required by the specifications. It is best to water
plants thoroughly before backfilling. Container plants should be moist at the
time of planting.
6. When the above operations have been completed, unless
otherwise specified, place a berm of soil around the perimeter of the pit to
form a basin or saucer to facilitate watering and retention of moisture.
7. Mulch all plants to the specified depth with approved
material (C&MS
661.11). The use of mulches prevents rapid temperature fluctuation, reduces
moisture loss, and aids in weed control.
Note: Installation can
directly affect a plants survival rate. Concentration on the installation
process is critical to a project's success or failure. Because the nature of
this work is based upon the end result (i.e., plants live or die), Inspectors
need to watch the installation closely. If the Inspectors have any questions
during the installation work, they should contact the Project Designer or other
knowledgeable personnel as soon as possible.
Preliminary Preparation
1. The Inspector and Contractor should jointly review and
become familiar with all plan sheets, quantities, details, specifications, and
other provisions of the Contract. At this time, questions or interpretations
can be answered or problems resolved through discussion with the landscape
architect, horticulturist, or other authorized persons.
2. Sources of materials, other than plants required for
planting operations, should be submitted for approval prior to use in the
planting operation. Some of the materials that may require approval prior to
use are topsoil, peat materials, (peats, mosses, humus, and related projected),
compost, fertilizer, lime, mulch, stakes, wire and hose, and wrapping material.
3. The Inspector or other approved personal should check
and approve the stakeout of all planting areas and planting pit locations prior
to excavation. Minor relocation of planting areas and pits can be done at this
time to avoid utility lines, rocky outcrops, drainage ditches, existing plants,
or impervious or wet soil conditions. If minor relocations of plantings are not
possible, the Inspector should contact the Landscape Architect to adjust the
design requirements.
Site Preparation
Prior to installing plant
stock at the construction site, the following preparation must be completed
according to the requirement of the contract plans and specifications.
1. Excavation of planting pits, pockets, or beds to the
required size and depth and spaced as shown on the plans.
2. On-site preparation of backfill mixture, as called for
by contract specifications. The backfill mix must consist of the following (C&MS
661.09):
a. One part excavated soil.
b. One part sphagnum peat moss, shredded pine bark, or
EPA rated Class IV compost.
c. One part sand.
d. A slow release commercial fertilizer (0-20-20 or
equal) added at a rate of 5 pounds per cubic yard (3kg/m) to the backfill mix.
Wrapping, and Bracing (661.12 and 661.13)
All plants should be pruned,
wrapped, and braced as specified.
1. Drive stakes solidly into the ground and guying
installed to prevent movement of the plant until the root system is firmly
established in the new planting location. See SCD
LA-1.2 for details.
2. Wrap trunks or stems of plants from the root crown to
the lower limbs with approved material to protect against drying or other
physical damage. Wrapping should not be done prior to planting deciduous trees.
3. Plants should be pruned at planting time to restore a
balance between the root and top growth. Tops should be pruned to compensate
for the partial loss of roots when the plant was removed from the nursery. Tops
should be pruned in a manner that will retain the characteristic shape of the
plant.
4. Broken or damaged branches must be removed. The
central leader of a deciduous tree should never be trimmed or removed.
Deciduous trees with competing leaders should not be accepted for the project.
5. Prune all broken, torn, or damaged roots, leaving a
clean cut surface to help prevent rot and disease.
6. Prune deciduous shrubs if only branches are broken
during installation. Coniferous evergreens normally should not be pruned,
except for broken branches, unless otherwise specified or directed.
7. Trees may be pruned before planting to save time and
trouble. At this time, hand clippers can be used to cut closer than can be done
with pole pruners (usually used for trees in an upright position). Pruning may
be done under the Inspector's supervision prior to planting.
8. The planting operation is complete by watering all
plants as specified.
9. See pruning diagram below.
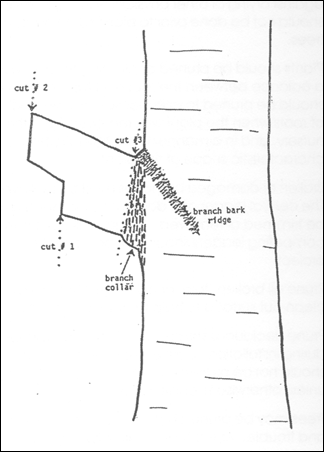
Figure 661.A – Pruning
Diagram
LANDSCAPE INSTALLATION
INSPECTION CHECKLIST
Project No.:_____________________ Date:
___________
County: _________ Route: _______ Section: _____________
Contractor: ____________________________________
Certified Landscape Technician:
____________________________________
Inspector: ____________________________________
|
Y |
N |
Item |
Remarks |
|
|
|
Plant Installation: General Condition |
|
|
|
|
Plant identification (proper species, tag, certification) |
|
|
|
|
Overall foliage, condition (shape, leaf color, wilt, scorch, etc.) |
|
|
|
|
Leaf discoloration (spots, splotches) |
|
|
|
|
Evidence of pruning (needed or properly performed) |
|
|
|
|
Insects (chewing damage, presence of insects) |
|
|
|
|
Condition of trunks and limbs (gashes, breakage) |
|
|
|
|
Soil conditions in container or rootball (moist, dry) |
|
|
|
|
Root system (rooted throughout, healthy white color) |
|
|
Y |
N |
Size Specifications |
|
|
|
|
Container size |
|
|
|
|
Rootball size |
|
|
|
|
Height |
|
|
|
|
Spread |
|
|
|
|
Caliper |
|
|
|
|
Plant Delivery. Storage and Handling |
|
|
|
|
All plants delivered on trucks are completely covered during transit |
|
|
|
|
Rootballs and containers protected from direct sun |
|
|
|
|
Handling and unloading from truck is done by the rootball or container and not by truck. |
|
|
|
|
Are plants adequately watered |
|
|
|
|
Plants are healed in until planted |
|
|
Y |
N |
Plant Installation |
|
|
|
|
Plant location staked in field |
|
|
|
|
Plant spacings conform to plan notes |
|
|
|
|
Plant pit or bed preparation conforms to details |
|
|
|
|
Plant is properly placed in pit |
|
|
|
|
Rootball relation to finished grade meets spec |
|
|
|
|
Rootball supporting devices removed (twine, wire, etc.) |
|
|
|
|
Backfill mix meets specifications |
|
|
|
|
Backfill placed in lifts and properly watered |
|
|
|
|
Fertilizers added if specified |
|
|
|
|
Plant is properly watered during installation |
|
|
|
|
Watering basin conforms to details |
|
|
|
|
Tree supports installed according to details( stakes, guy wire) |
|
|
|
|
Vegetation barriers installed according to details |
|
|
|
|
Mulch installed according to details |
|
|
|
|
Tree trunk is wrapped to first branch |
|
Period
of Establishment (661.14)
Warranty Periods
Landscape projects normally
include a period of establishment. During this time, all plantings on the
projects shall be under the care of the Contractor. This period begins
immediately upon completion of the planting operation for any plant or species
group and continues until October 1, but no less than one growing season (i.e.,
June 1 to October 1).
The stress caused by improper
handling may not show its effect immediately. Plants, particularly large trees,
may be under stress for months before showing obvious signs. By then, it is
difficult to relate the damage to the plant installation phase rather than the
maintenance it has received. Again, this points out the need for care early in
the installation to make sure that the quality of plants is the highest and the
care they receive is the best.
During the establishment
period, the Contractor must water, re-mulch, re-stake, and cultivate as
necessary. The Contractor is required to
perform two weeding and mowing programs around trees, guy stakes, shrubs, and
bed edges in order to remove all weeds and grasses from the planted and mulched
areas. The first program should begin
around June 15 and the second approximately 8 weeks later.
Plant Establishment Period –
Final Inspection
This inspection should be
done on or about October 1 and include a plan-in-hand review of each planting
area or bed to determine the arrangement, number, and species of plants called
for on the planting plans are present. If all plants have been properly
installed, there should be minimal settlement of the backfill. Proper mulch
depth should be checked, as this will affect plant survival.
The Contractor must remove
all stakes, guy wires, and wrapping material from plantings just prior to final
inspection, except for any replacement plantings that have not been through
their establishment period (C&MS
661.14).
Since this inspection is of
major importance to the ultimate success if the project, the Contractor,
Inspector, and Designer should be members of the inspection team.
All plants rejected during
the inspection should be removed and replaced by new plants which meet all of
the requirements of the project and specifications. The final acceptance of the
project should not have been completed until all plant replacements have been
satisfactorily made.
ESTABLISHMENT CHECKLIST - FINAL
INSPECTION
|
Y |
N |
Item |
Remarks |
|
|
|
Foliage |
|
|
|
|
Leaf wilt or browning |
|
|
|
|
Leaves healthy and green |
|
|
|
|
Yellowing |
|
|
|
|
Spots of discoloration |
|
|
|
|
Evidence of insect damage |
|
|
|
|
Web or cocoons (caterpillars present) |
|
|
|
|
Disease present |
|
|
|
|
Remarks: |
|
|
|
|
Tree trunk and limbs |
|
|
|
|
Damage at the base of trunk |
|
|
|
|
Broken limbs that need to be pruned |
|
|
|
|
Dead limbs (no leaves present) |
|
|
|
|
Damage from insects, birds, rodents, or animals |
|
|
|
|
Sucker growth (prune out) |
|
|
|
|
Straighten plant if needed |
|
|
|
|
Misc. |
|
|
|
|
Planting pit and rootball |
|
|
|
|
Exposed roots (mulch is needed) |
|
|
|
|
Settled backfill (replace as needed) |
|
|
|
|
Animal damage |
|
|
|
|
Moisture level of soil (water if needed) |
|
|
|
|
All stakes, guy wires and wrapping removed |
|
|
|
|
Weeds in mulch |
|
|
|
|
Leaning trees (straighten if needed) |
|
|
|
|
Plant replacement |
|
|
|
|
Dead and missing plants replaced |
|
|
|
|
Vandalism or vehicular damage |
|
|
|
|
Ground cover and shrub bed area |
|
|
|
|
Weeded |
|
|
|
|
Dead shrubs (replace if needed) |
|
|
|
|
Straighten if needed |
|
|
|
|
Misc. |
|
|
|
|
Remarks: |
|
Plant Substitution List
Occasionally,
landscape contractors may need to make recommended substitutions to the plant
material list. This can occur if the plants are not available locally, there's
not enough to meet the project requirements, or the specified size is no longer
available. These substitutions should be pre-approved by the Designer before
the Contractor purchases the plants.
Listed
below is a chart to keep records on these substitutions.
|
Specified Plant |
Substitution |
|
|
|
|
|
|
|
|
|
|
|
|
|
|
|
|
|
|
|
|
|
|
|
|
|
|
|
Method of Measurement and Basis of Payment (661.17 and 661.18)
Measurement is done by
counting the number of each species and size that was completed and accepted.
The Contractor is paid 40
percent of the bid price of each item when it is delivered to the project and
is paid 40 percent after each item is planted.
At the end of the
establishment period, after the final inspection, the Department will determine
the actual number of living plants. The
Department will pay the remaining 20 percent of the bid price for all living
plants at the end of the establishment period.
If for each pay item, less
than or equal to 5 percent of the installed plants require replacement at the
time of Project Completion, the Engineer may waive the establishment period for
the replacement plantings, provided that the replacement plantings are
installed in accordance with this specification and in the presence of the
Engineer or Inspector.
If for each pay item, more
than 5 percent of the installed plants require replacement at the time of
Project Completion, the Contractor is required to install the replacement
plantings in accordance with this specification. The Department will pay the remaining
percentage of the bid price at the time of Project Completion. The replacement plantings are subject to the
one year establishment period regardless of the Project Completion date. After the replacement plantings complete the
one year establishment period, the Department will inspect the replacement
plantings and notify the Contractor of the Departments’ findings. As final remedy under the contract, the
Contractor is required to install replacement plants for all plantings that did
not survive the establishment period at no additional cost to the State.
661 Appendix I – Shade Trees
Height relationship to
caliper:
|
Caliper (inches) |
Avg. Height Range (feet) |
Maximum Height (feet) |
Minimum Diameter Ball (inches) |
|
3/4 |
6 to 8 |
10 |
14 |
|
1 |
8 to 10 |
11 |
16 |
|
1-1/4 |
8 to 10 |
12 |
18 |
|
1-1/2 |
10 to 12 |
14 |
22 |
|
1-3/4 |
10 to 12 |
16 |
24 |
|
2 |
12 to 14 |
16 |
24 |
|
2-1/2 |
12 to 14 |
16 |
28 |
|
3 |
14 to 16 |
18 |
32 |
|
3-1/2 |
14 to 16 |
18 |
38 |
|
4 |
16 to 18 |
22 |
42 |
|
5 |
18 and up |
26 |
54 |
Tree caliper is measured 6
inches above ground level, up to and including 4 inch caliper size, and 12
inches above the ground for larger sizes.
Container Specifications – Shade
Trees
Tree sizes and acceptable
container sizes:
|
Height |
Container Size |
|
12 in. 18 in. 2 ft. 3 ft. |
#1 |
|
2 ft. 3 ft. 4 ft. |
#2 |
|
4 ft. 5 ft. 6 ft. |
#3 |
All container grown plants
shall be healthy, vigorous, well rooted, and established in the container in
which they are sold.
An established,
container-grown tree is a tree which is transplanted into a container and grown
sufficiently long for new fibrous roots to have developed, so the root mass
will retain its shape and hold together when removed from the container.
661 Appendix II - Deciduous Shrubs
|
Height |
Minimum Diameter Ball (inches) |
|
12 in. |
8 in. |
|
18 in. |
9 in. |
|
2 ft. |
10 in. |
|
3 ft. |
12 in. |
|
4 ft. |
14 in. |
|
5 ft. |
16 in. |
|
6 ft. |
18 in. |
|
7 ft. |
20 in. |
|
8 ft. |
22 in. |
|
9 ft. |
24 in. |
|
10 ft. |
26 in. |
Plants dug to the
specifications in the above table should have the center of the stem or cluster
of stems of the plant in the center of the ball.
661 Appendix III - Coniferous Evergreens
Broad spreading and Globe Types (eg., Taxus media)
|
Height |
Minimum Spread |
Minimum Diameter Ball |
|
6 in. |
6 in. |
|
|
9 in. |
9 in. |
8 in. |
|
12 in. |
l0 in. |
8 in. |
|
15 in. |
12 in. |
10 in. |
|
18 in. |
15 in. |
10 in. |
|
2 ft. |
18 in. |
12 in. |
|
2-1/2 ft. |
21 in. |
14 in. |
|
3 ft. |
24 in. |
16 in. |
|
3-1/2ft. |
|
18 in. |
|
4 ft. |
|
21 in. |
|
5 ft. |
|
24 in. |
Container Grown Specifications
|
Height |
Container Size |
|
6in. 9in. 12 in. |
#1 |
|
12in. 15in. |
#2 |
|
18in. 2 ft. 2-1/2 ft. |
#3 |
Conicals, Broad Upright, and Columnar (e.g., Pinus, Picea, and Thuja)
|
Height |
Spread |
Minimum Diameter Ball |
|
12 in. |
8 to 12 in. |
10 in. |
|
15 in. |
9 to 15 in. |
10 in. |
|
18 in. |
12 to 18 in. |
10 in. |
|
2 ft. |
15 to21 in. |
12 in. |
|
2-1/2 ft. |
18 to 24 in. |
12 in. |
|
3 ft. |
21 to 30 in. |
14 in. |
|
4 ft. |
2-1/2 to 3 ft. |
16 in. |
|
5 ft. |
3 to 4 ft. |
20 in. |
|
6 ft. |
|
22 in. |
|
7 ft. |
|
24 in. |
|
8 ft. |
|
27 in. |
|
10ft. |
|
34 in. |
|
12 ft. |
|
34 in. |
Ball sizes should always be
of a diameter and depth to encompass enough of the fibrous and feeding root
system as necessary for the full recovery of the plant.
Plants dug to the
specifications in the above table should have the center of the stem or cluster
of stems of the plant in the center of the ball.
Container Grown Specifications
|
Height |
Container Size |
|
6 in. 9 in. 12 in. 15 in. 18 in. |
#1 |
|
12 in. 15 in. 18 in. 2 ft. |
#2 |
|
18 in. 2 ft. 2-1/2 ft. 3 ft. 3-1/2 ft. |
#3 |
661 Appendix IV - Broadleaf Evergreens
Spreading and Dwarf Types (e.g., Buxus and Cotoneaster)
|
Spread |
Minimum Diameter Ball (inches) |
|
18 in. |
10 in. |
|
2 ft. |
12 in. |
|
2-1/2 ft. |
14 in. |
|
3 ft. |
16 in. |
|
3-1/2 ft. |
18 in. |
|
4 ft. |
21 in. |
Container Grown Specifications
|
Height |
Container Size |
|
6 in. 9 in. 12 in. |
#1 |
|
12 in. 15 in. |
#2 |
|
18 in. 2 ft. 2-1/2 ft. |
#3 |
All container grown plants
shall be healthy, vigorous, well rooted, and established in the container in
which they are sold. They shall have quality tops and be in a healthy growing
condition.
Cone and Broad Upright Types (e.g., Rhodoendron)
|
Height |
Minimum Diameter Ball (inches) |
|
18 in. |
10 in. |
|
2 ft. |
12 in. |
|
3 ft. |
14 in. |
|
4 ft. |
16 in. |
|
5 ft. |
20 in. |
|
6 ft. |
22 in. |
Container Grown Specifications
|
Height |
Container Size |
|
6 in. 9 in. 12 in. 15 in. 18 in. |
#1 |
|
12 in. 15 in. 18 in. 2 ft. |
#2 |
|
18 in 2 ft. 2-1/2 ft. 3 ft. 3-1/2 ft. |
#3 |