206 Chemically Stabilized Subgrade
Uses and Application for Chemically Stabilized Subgrade
Contractor Designed Chemically Stabilized Subgrade (206.06)
Method of Measurement (206.07)
Documentation Requirements – 206 Chemically Stabilized Subgrade
Uses and Application for Chemically Stabilized Subgrade
Use chemically stabilized subgrade for improving long sections of subgrade, generally more than a mile. It is generally not cost effective for short spot locations. If the chemical stabilization is not in the plans and is being added to the project in order to address a subgrade problem, use the Subgrade Treatment Chart in Figure 204.H to determine the appropriate depth of chemical stabilization. If the chemical stabilization is in the plans, the designer used Geotechnical Bulletin 1, Plan Subgrades, from the Office of Geotechnical Engineering to design the chemical stabilization.
There are primarily two types of chemicals used to treat soil: cement and lime.
Cement is most effective in treating soils with a plasticity index (PI) less than 20, such as sandy and silty soils like A-3a, A-4a, A-4b, A-6a, and some A-6b soils. Use cement stabilized subgrade to treat areas with N values (SPT blow counts) as low as 5, unconfined strengths (hand penetrometer) as low as 0.5 tsf and to remove ruts up to 12 inches (300 mm) deep.
Lime is most effective in treating soils with a PI greater than 20, such as A-7-6 and A-6b soils. Use lime stabilized subgrade to treat areas with N values (SPT blow counts) as low as 10, unconfined strengths (hand penetrometer) as low as 1.0 tsf and to remove ruts up to 6 inches (150 mm) deep.
Materials (206.02)
If using cement, use Type 1 cement according to 701.04. If using lime, there are two types of lime used for soil stabilization: quick lime and hydrated lime. Quick lime is used most of the time. Quick lime must all pass through the No. 4 (4.75 mm) sieve. Lime must come from a supplier listed on the QPL.
Lime kiln dust is another material that can be used for soil stabilization. The Department has limited experience with lime kiln dust for soil stabilization, so it is generally not included in the plans. However, the contractor may propose to use it in a value engineering change proposal. Lime kiln dust must conform to 712.04.C.
The curing coat can consist of a rapid setting emulsified asphalt prime coat or a curing compound. The prime coat may be specified by plan note to discourage traffic on the subgrade during the curing period. The prime coat remains tacky, so equipment operators tend to stay off of it.
Limitation (206.03)
Chemical stabilization should not be performed when the temperature is below 40 ºF (5 ºC) or the ground is frozen. In order to stabilize the soil, the lime or cement needs to react with the water in the soil. It cannot do that if the water is frozen. If it is raining, then the free water will react with the lime or cement instead of the water in the soil.
Spreading lime and cement creates some dust. For this reason, the chemical stabilization should not be performed when it is windy, as this will spread the dust outside of the project area.
Test Rolling (206.04)
If chemical stabilization is specified in spot locations, use test rolling with a proof roller to locate areas that require the chemical stabilization. If rutting is significant, (greater than 6 inches for cement, greater than 4 inches for lime) investigate the subgrade by digging test pits. After the chemical stabilization is complete, proof roll the stabilized areas.
If chemical stabilization is specified throughout the project, do not test roll before stabilization, but do perform proof rolling after the chemical stabilization work is complete.
Construction (206.05)
Spreading (206.05.A)
The amount of chemical applied to the subgrade is based on a percentage of the dry weight of the soil that will be treated. The percentage is typically 4 to 10 percent for cement and 4 to 8 percent for lime. If the Contractor Designed Chemically Stabilized Subgrade pay item is included in the plans, the contractor will determine the appropriate percentage of chemical based on a testing program. If the pay item for the contractor designed subgrade is not included in the plans, then use the percentage given in the plans or the percentage given in 206.05.
When lime is shown on the plans, the quantities and percentage of lime are based on the use of hydrated lime. If the contractor chooses to use quick lime and the percentage is not determined from the Contractor Designed Chemically Stabilized Subgrade test program, adjust the percentage to account for the fact that hydrated lime is not being used (typically this means using 4 percent quick lime rather than 5 percent hydrated lime).
To calculate the spreading rate (number of pounds of the chemical per square yard), use the following equation.
C = 0.75 × T × D × P
where:
C = spreading rate for chemical (pounds per square yard)
T = thickness (or depth) of stabilization (inches)
D = average dry density of soil (110 pounds per cubic foot)
P =
percentage of chemical, expressed as a decimal
(e.g. 5% = 0.05)
0.75 is a unit conversion factor (9 ft2 / 1 yd2 × 1 ft / 12 in)
For example, if using 5% of a chemical and a 12 inch depth of treatment:
C = 0.75 × 12 in × 110 lb/ft3 × 0.05 = 49.5 lb/yd2 of chemical
The contractor must submit a spreading plan or report two days before the work that indicates how the contractor will achieve the required spreading rate. After the spreading operation, check the contractor’s spreading rate by taking the total weight of chemical spread and dividing it by the area that was treated. To check the spreading rate during the work, take a pan and place it on the prepared surface in front of the spreading truck (the pan will have to be placed in a small depression to keep the shroud from knocking it over). Once the spreader has passed and filled the pan with the chemical, weigh the filled pan. Determine the weight of the chemical by subtracting the weight of the pan. Calculate the spreading rate by dividing the weight of the chemical by the area of the pan (remember to convert the area of the pan to square yards).
Example: Weight of pan and chemical = 7.3 lb
Weight of pan = 2.8 lb
Pan is 9 in × 13 in
![]()
When a mechanical spreader is used, dusting is minimized by using a shroud around the spreader bar that extends to the surface. A distribution bar with a maximum height of 3 feet (1 m) above the subgrade can be used. The chemical should not be spread if wind conditions are such that blowing dust exceeds the limits in 107.19.
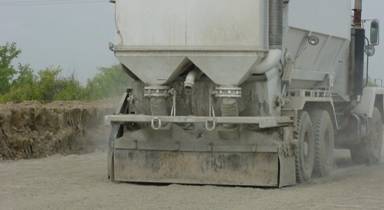
Spreading cement with a shroud around the spreader bar
Mixing (206.05.B)
The contractor should mix the chemical into the soil immediately after spreading the chemical. The specifications require a power driven rotary mixer which looks like a big rotary tiller.
Mixing Cement
The specification describes a two step process for mixing cement into the soil, but a single mixing is allowed if the contractor can add water through the mixer and obtain the required gradation with the single mixing. For cement, at least 80 percent of the mixed soil must be smaller than the openings in a No. 4 sieve and all of the soil clods must be smaller than 1 inch (25 mm). Any stones in the soil that would be retained on the No. 4 sieve are not considered when calculating the percentage. If necessary, add water until the soil-cement mixture is at optimum moisture content. Determine the optimum moisture content from the moisture-density curves developed in the test program from the Contractor Designed Chemically Stabilized Subgrade, or by using the Ohio Typical Moisture Density Curves and the one point proctor method in Supplement 1015. To ensure thorough mixing, check the mixture for uniform color.
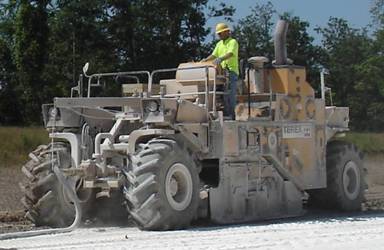
Rotary mixer for chemical stabilization
Mixing Lime
Lime stabilization requires two separate mixings with a mellowing period in between the mixings. During the initial mixing, all the soil clods are reduced to a maximum size of 2 inches (50 mm) and water is added if necessary to bring the mixture to at least the optimum moisture content if using hydrated lime and to at least 3 percent above optimum moisture content if using quick lime. Quick lime reacts more strongly with water and the additional water prevents future expansion problems. Determine the optimum moisture content from the moisture-density curves developed in the test program from the Contractor Designed Chemically Stabilized Subgrade, or by using the Ohio Typical Moisture Density Curves and the one point proctor method in Supplement 1015.
After the initial mixing, lime stabilized subgrade is allowed to sit undisturbed (mellowed) for at least 24 hours, but not more than 7 days. During the mellowing period, the clumps of lime break down and the lime reacts with the soil, breaking up the soil clods. After the second mixing at least 60 percent of the mixed soil must be smaller than the openings in a No. 4 sieve and all of the soil clods must be smaller than 1 inch (25 mm). Any stones in the soil that would be retained on the No. 4 sieve are not considered when calculating the percentage. To ensure thorough mixing, check the mixture for uniform color.
Compaction (206.03.C)
Chemically stabilized subgrade should be compacted immediately after the shaping and final mixing. For cement the compaction needs to be completed within 2 hours of adding water. Compaction is performed with a vibratory, footed roller weighing at least 10 tons (9 metric tons). However, the final rolling is performed with a smooth drum roller without any vibration.
For the compaction testing criteria, use 98 percent of the maximum dry density and use the one point proctor method in Supplement 1015 to determine the maximum dry density. In some cases, the test section method or the moisture-density curves developed by the contractor may be used to determine the maximum dry density.
Check the depth of the stabilization by digging a hole. Apply phenolphthalein or dilute hydrochloric acid to the side of the hole to check for the presence of lime or cement. Phenolphthalein will turn purple and dilute hydrochloric acid will fizz.
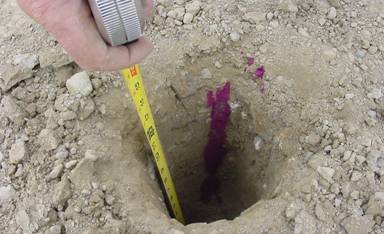
Checking depth of soil stabilization with phenolphthalein
Curing (206.03.D)
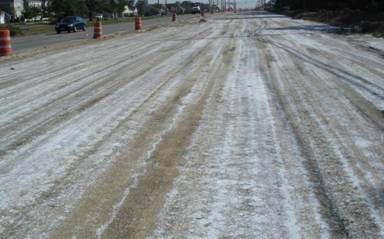
The chemically stabilized subgrade must cure for at least 5 days. The surface of the chemically stabilized subgrade is covered with an emulsified asphalt (prime coat) or curing compound to retain moisture in the subgrade during the curing period. However, before the curing coat is applied, the surface must be wet. If the surface has dried out (turns white) before the curing coat is applied, then the contractor needs to add more water to the surface.
The curing coat must uniformly cover the surface of the chemically stabilized subgrade. The following photos show an example of good coverage and poor coverage using a curing compound.
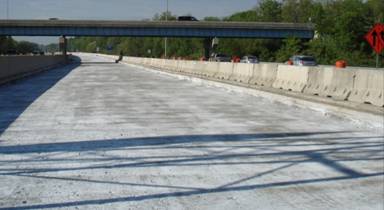
Example of good coverage with curing compound
Example of poor coverage with curing compound
Curing coats can leach off the subgrade if not cured completely prior to a rain event. During the curing period, all equipment should stay off the subgrade.
Proof Rolling (206.03.E)
Proof roll the chemically stabilized subgrade after the cure period. If the stabilization was performed properly and the planned depth of stabilization was adequate, there should be no deflection or rutting.
Fine Grading (206.03.F)
The chemically stabilized subgrade is constructed an inch high. This top inch is often dry and unsuitable. It is removed during the fine grading.
The aggregate base needs to be placed within 60 days of the fine grading.
Contractor Designed Chemically Stabilized Subgrade (206.06)
If the pay item for Contractor Designed Chemically Stabilized Subgrade is included in the plans, then the contractor uses the testing program described in Supplement 1120 to determine the spreading rate for the chemical. Different mixtures of the soil and chemical are tested for unconfined compressive strength. The results are used to determine the percentage of chemical used in the field. The common increase in strength ranges from 20 psi to 100 psi with lime and from 50 psi to 200 psi with cement.
Method of Measurement (206.07)
When lime is shown on the plans, the quantities and percentage of lime are based on the use of hydrated lime. If the contractor chooses to use quick lime, the quantity of lime measured for payment is increased by the equation in 206.07. This is done because generally less quick lime is required than hydrated lime to have the same soil improvement.
Documentation Requirements - 206 Chemically Stabilized Subgrade
1. Materials per 206.02
2. Check contractor designed lime or cement percentage.
3. Verify subgrade line and grade.
4. Verify subgrade stability with proof roller, if variable locations.
5. Document the Construction: Spreading, Mixing, and Compaction
6. Perform the compaction testing according to Supplement 1015.
7. Proof Rolling results.
8. Measure and Pay according to 206.07 and 206.08
9. Document on CA-EW-2, CA-EW-12, CA-D-1, and CA-D-3. Do not duplicate the information on all forms unless necessary.