513 Structural Steel
Documentation Requirements – 513 Structural Steel Members
Field Inspection
When the steel arrives on the site and prior to erection it should be inspected for damage and quality of fabrication as thoroughly as time and conditions permit. Fabricated steel should have a TE-24 with the shipment. If fabricated steel does arrive without a TE-24 either the District Engineer of Tests or the Office of Material Management’s structural steel section should be notified.
Damage
The nature and extent of any damage that may have occurred because of loading, transit, or unloading should be noted along with the identifying piece mark or member. If corrective work is obvious, advise the Contractor immediately so that the responsible party can be notified and correction can be performed in the most advantageous location.
Storage
Structural steel stored on the site shall be supported off the ground on blocking and stored in an upright position where it will not be affected by drainage. Many times the Contractor will secure angle iron across the top flanges of adjacent beams to prevent them from tipping over. If angle iron or other metal is secured across the top of the beams, it is important to insure that the Contractor has not secured the angles or other metal by welding it to the beam.
Sweep
The specified tolerance for sweep or horizontal curvature of a beam or girder is 1/8 inch (3 mm) in 10 feet (3.05 m). This can be applied to any 10 feet (3.05 m) length of the member or multiple of 10 feet (3.05 m) lengths up to the total length of the fabricated section. Thus, a beam 100 feet (30.5 m) long, checked for its entire length, must not deviate more than ten one-eighth inches (3 mm) for a total of 1-1/4 inches (32 mm) from a taut line stretched between its ends.
Shop Coatings
Any members where thickness appears questionable from a visual examination shall be checked in the field, preferably prior to erection.
General (513.04)
The Contractor is required to furnish the necessary access and area for inspection of all operations. The inspector should not occupy the same float or suspended platform used by the workmen for safety reasons.
Required Documents (513.05)
A TE-24 in the project file provides verification that the structural steel is accepted material and fabrication has been properly performed.
Check of Bearing Seats
A final check shall be made of the elevation of bearing seats on the piers and abutments before erection of structural steel is scheduled to begin. If bearing seats are found that need to be corrected, it must be performed in the manner and to the tolerances described in 511 Bearing Seats of this manual.
The findings of this final check should be filed in the project records.
Erection Methods
Methods and equipment accepted for erection of members must be used in handling during transportation to the bridge site and unloading.
The erection drawings, usually the “E” sheets of the accepted shop drawings, must be used to locate the members on the bridge and may give special instructions for the erector to follow.
Deviations from the accepted erection procedure are not permitted. If the erector proposes deviations in procedure that appear to have merit, they must be referred to the Office of Structural Engineering for review prior to use.
Required Erection Procedures
The specifications require that the Contractor submit an erection procedure for structural steel members. If there is railroad involvement, the PE stamped plan needs to be reviewed and approved by the appropriate railroad. Otherwise the plan must have two PE stamps. For additional requirements refer to CMS 501.05.
Typical Erection Procedures Items
Typical items that should be included in the proposed erection procedure are:
1. A drawing of the complete framing plan showing each girder or beam section by “piece mark” and numbered in the order of proposed erection.
2. A print of the erection sheet of the shop drawings may be used.
3. The number of pieces and load capacity of erection equipment to be used and method of lifting members
4. Field splices to be made on the ground.
5. The number of field splice holes to be filled before erected members are released and allowed to deflect (50 percent required - preferably one-half with pins and one-half with bolts)
6. Methods and details for supporting the first beams or girders at the abutments and piers in each unit - Where some sort of attachment to the pier is used, it should be fully described as to size of members and method of attaching to the pier and steel. In addition to supporting the beams at the abutment and piers, there may also be additional bracing of the top flange at mid-span to prevent the beam from twisting or buckling under its own weight.
Use Erection Checklist Form CA-S-20.
High Strength Bolting (513.20)
The following described operations are intended to clarify some of the important requirements of the specifications.
Joint Assembly
The beams or girders to be spliced must have their ends brought together at the correct relative elevation with respect to support points, and held at the elevation (and in correct alignment) so that heavy drifting is not necessary to align the holes.
Sufficient pins must be installed to obtain accurate alignment of parts and sufficient bolts to compact the joint. Before the beams or girders are released and allowed to deflect, at least 50 percent of the holes must be filled with pins and snug-tightened bolts. A minimum of 25 percent pins is desired, however, if less than 25 percent will carry the stress. If additional pins cannot improve matching of holes, a lesser number will be satisfactory. If less than 25 percent pins are used, the remaining holes should be filled with snug-tightened bolts. Some joints that will be highly stressed probably will require more than 50 percent of the holes filled with drift pins and snug-tightened bolts; note such cases on the accepted erection procedure. Due to the possibility of damaging the threads on the bolts, any bolts installed prior to installing the drift pins shall be replaced.
On some beams and girders it is possible for the initial bolts used to compact the joints to become loose when the remaining bolts are installed. After all the remaining holes have been filled with bolts and tightened to at least a snug tight condition, the initial bolts should be checked to assure that they are still snug tight.
When the splice is made on the ground all operations to complete the splice shall be performed.
Pins shall be cylindrical and not more than 1/32 inch (1 mm) smaller than the diameter of the hole.
All holes not filled with pins shall be filled with bolts and bolt tightening operations completed on them before removal of any pins.
Bolt Tightening
Tighten bolts by the turn-of-the-nut-method:
1. tighten the bolt to a snug-tight condition
2. match mark the protruding end of the bolt and adjacent surface of the nut
3. tighten the nut the additional specified rotation
Greater variation in tension is usually obtained when the snug-tight condition is performed with power wrenches. More consistent tension is obtained with spud wrenches. When the steel surfaces are flat and compact, the snug-tight condition is obtained when bolt tension is between 5,000 and 10,000 pounds (22,222 and 44,444 newtons).
Snug tight is accomplished by either an impact wrench or an ordinary spud wrench. If an impact wrench is used, snug tight is achieved when the impact wrench begins to impact or hammer on the bolt. This will happen almost immediately after tightening with the impact wrench begins. When a spud wrench is used, snug-tight is achieved when the full effort of a man is applied to the spud wrench and the nut cannot be tightened any further.
Bolts must be match marked after the bolts have been tightened to a snug-tight condition. The purpose of the match mark is to measure the amount of rotation of the nut relative to the bolt. The match marks must be placed properly in order to measure this rotation. The match marks must be placed on the end of the bolt and the adjacent surface of the nut. Contractors have placed match marks in several other locations; however, none of these locations allow the relative rotation of the nut to the bolt to be measured
(See Figures 513.A and 513.B - Match Marked Bolts).
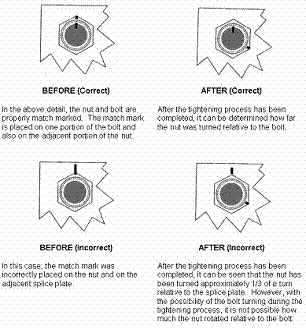
Figure 513.A - Match Marked Bolts
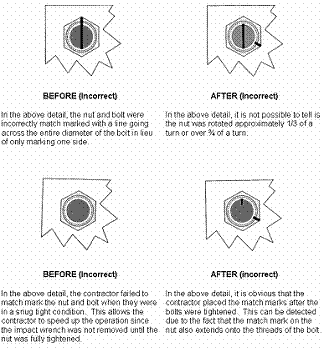
Figure 513.B - Match Marked Bolts
During final tightening, all of the specified rotation must be performed. Although the bolts may be over-tightened in the snug-tight condition by power wrenches, the full specified rotation is still required. A maximum tension is not specified and excessive tension is not cause for rejection.
The first complete joint on a project must be tested. If certain conditions are met, inspection of subsequently-completed joints by testing may be waived by the Engineer. These conditions are:
1. The Engineer has accepted the compactness of the joint.
2. The snug-tight operations have been witnessed and accepted by the Engineer.
3. Match-marking of the protruding end of the bolt and nut have been performed and indicates the required rotation. The Engineer must be satisfied that these conditions have been met completely before the joint will be considered accepted and testing waived.
4. Galvanized A 325 (A 325 M) bolts, and bolts that were installed prior to inserting drift pins and subsequently replaced, shall not be reused. All other A 325 (A 325 M) black (un-galvanized) bolts may be reused if accepted by the Engineer. Re-tightening previously tightened bolts that may have been loosened by the tightening of adjacent bolts is not considered reuse.
Inspection of Bolted Joints
Even though a joint may appear to have all the bolts in the joint properly match marked and tightened, there is still the possibility that these bolts were not properly tightened. Therefore, it is necessary for the Contractor to provide a torque wrench and a recently calibrated tension testing devise.
The minimum torque required must be determined prior to inspecting the bolts with the torque wrench. This is accomplished with the aid of the tension testing devise. A bolt is first placed in the tension testing devise and tightened to the required tension as given by Table 513.20-2 in the CMS. The torque wrench is then used to determine how much torque is required to turn the nut on the bolt after the minimum tension has been achieved. When calibrating the torque wrench, the Engineer should hold his hand on the nut being tightened in order to detect movement or rotation of the nut on the bolt. The required torque is based on the average torque of three bolts.
The torque wrench should be calibrated at the beginning of each day it is used and for each diameter or length of bolt being tested. Also if the coating varies (i.e. galvanized bolts as opposed to un-coated bolts), the torque wrench should also be calibrated.
Torque wrenches must have the capacity of the maximum job inspection torque required for any bridge.
The Contractor applying the torque should perform the inspection only up to the job inspection torque.
The erector must furnish the Engineer with evidence that the manufacturer or a laboratory has checked the tension-testing device within one year.
Welding (513.21)
Welding requirements must be according to the current ANSI/AASHSTO/AWS “Bridge Welding Code” except as modified by Supplement 1011 and the Construction and Material Specifications.
No attachments, other than specified by the plans, shall be made by welding to any main structural members such as beams, girders, cross bracing, truss members, etc., unless accepted by the Office of Structural Engineering.
Approval of Welders
All welds must be performed by welders qualified for the specific welding method to be used, according to Supplement 1011. The Office of Material Management must approve all welders prior to any welding. A list of qualified welders is maintained by the Office of Materials Management. Welders must have been tested in the last five years.
Electrodes and Welding Procedures
Electrodes used to make all permanent welds to steel must be of the low hydrogen type and must be on the list of accepted electrodes maintained by the Office of Material Management.
In order to prevent moisture in the atmosphere from being absorbed by the electrodes (which can cause potential cracking of the weld), all stick electrodes must be purchased in a hermetically-sealed container or must be dried in an oven at 450 to 500° F (232 to 260° C) for two hours and stored in a suitable container that will maintain a temperature of not less than 250° F (121° C). After removal for use, stick electrodes exposed to the atmosphere for more than four hours for E70XX electrodes and two hours for E80XX electrodes must be re-dried at a temperature of 450 to 500° F (232 to 260° C) before use.
When electrodes have become wet, the coating on the electrode is altered. Drying the electrodes does not restore the electrode coating to the original manufactured condition. Therefore, electrodes that become wet shall not be used.
The welding procedure using shielded metal arc electrodes (stick welding) is the only pre-accepted procedure. If the Contractor proposes to use flux core arc welding (FCAW), submerged arc welding (SAW), or gas metal arc welding (GMAW), he must first have a welding procedure qualification test accepted and then submit a welding procedure specification for approval. Questions on welding procedure qualification tests and welding procedure specifications can be answered by the Office of Material Management’s structural steel section.
Weather Restrictions
When the base metal is below the temperature listed in Table 513.A for the thickness of the material being welded, it must be preheated in such a manner that surfaces being welded are at or above the specified minimum temperature for a distance equal to the thickness of the part being welded but not less than 3 inches (76 mm), both laterally and in advance of the welding.
|
Thickness of Thickest Part at Point of Welding – Inches (mm) |
Minimum Temperature |
|
|
A709 70W |
All Other Steel |
|
|
To ¾ (19), incl. |
50° F (10° C) |
50° F (10° C) |
|
Over ¾ to 1 ½ (19 to 38), incl. |
125° F (50° C) |
70° F (20° C) |
|
Over 1 ½ to 2 ½ (38 63.5), incl. |
175° F (80° C) |
150° F (65° C) |
|
Over 2 ½ (63.5) |
225° F (110° C) |
225° F (110° C) |
Table 513.A – Minimum Preheat Interpass Temperatures
When the base metal temperature is below 32° F (0° C), the above specified should be preheated to minimum temperature of at least 70° F (20° C). Preheating is only necessary where the welding begins. Continued welding will make further preheating unnecessary. Welding shall not be done when the ambient temperature is below 0° F (-18° C).
Welding Inspection
The welding operations should be observed and complete welds inspected for conformance to the plans and shop drawings. Fillet welds must be measured with the use of a weld gage or other method that will show the length of the sides in contact with the steel. Deficient welds must be built up to the required size. Badly-shaped welds or welds containing defects such as cracks, pits, craters, and undercutting must be corrected to the satisfaction of the Engineer.
When radiographic examination of welds is required, the report and film must be submitted to the Office of Materials Management, Structural Steel Section, for review and approval. This must be done before any work is performed that would interfere with any necessary corrective work.
Arc Strikes
Occasionally during the welding operation, the electrode will come in contact with an area of steel that is not to be welded. This contact will result in a small burnt spot (or arc strike) in the steel. If not properly removed, an arc strike has the potential of propagating fatigue cracks.
Arc strikes located must be removed by grinding. They can result in unacceptable hard spots or small cracks. Therefore, after the arc strikes are removed, the Contractor must check every location where they occur where the steel is in tension. The Contractor must perform a magnetic-particle test on all arc strike in these locations to assure that no cracks are present. Hardness tests must also be run on all locations to assure that no unacceptable hard areas are present. Hardness values shall not exceed the higher of Rockwell C30 or the hardness value measured in the steel outside the location of the arc strike. If the above testing reveals unacceptable results, the flaw can be removed by grinding and the steel be retested to assure that the flaw has been completely removed.
Normally the Contractor is not equipped nor has the knowledge to perform the above test. Therefore, he will normally make arrangements for a private testing laboratory to perform the required testing.
Cleaning Of Welds
The finished weld must have all slag removed and be neutralized by vigorous wire brushing to remove any film that will affect the proper adherence of paint.
Stud Welding
Shear studs are short rods that have been welded to a piece of steel for the purpose of anchoring that steel to concrete. There are additional requirements to inspect the weld joining the shear stud to a piece of steel.
Qualified Stud Welder Operator
Prior to allowing any production welding, it is first necessary to assure that the stud welder operator is qualified. This is accomplished at the project site since there is no list of qualified stud weld operators.
To be qualified, it is necessary to successfully weld two studs of the same type and size that will be used during the production welding. The studs must be welded to a piece of steel that is similar to the production member in thickness and property or they may be welded to the production member.
The studs should be visually examined after they have been welded. If they were welded properly there should be weld metal completely around the base of the stud (360 degree flash).
In addition to a visual examination, the studs must be bent to an angle of approximately 30 degrees from their original axis. Bend the studs by either striking them with a hammer or bending the stud by use of a pipe.
If the visual examination does not reveal a 360-degree flash or if the weld fails when the studs are bent over, the Contractor must make corrections to his procedure and two more studs must be welded and tested. This should continue until two consecutive studs are tested and found to be satisfactory.
Qualifying the Stud Welding Procedure
Prior to production welding, it is necessary to qualify the stud welding procedure. This should be performed at the beginning of each day’s shift, when welding has been interrupted for an hour or more, when attaching the welding cable to a different ground, when changing weld settings, when changing loops in the cable, or when 500 studs have been welded after testing.
The actual testing shall be the same as required for qualifying the stud welding operator.
Post Testing of Stud Welds
After the studs have been welded, it is necessary to test the studs to insure that they have been installed correctly. Test the studs by giving each one a light blow with a hammer. When the studs are tapped, they should emit a ringing sound. Any stud that does not emit a ringing sound should be bent approximately 15° from its original axis.
Perform a visual inspection in addition to tapping the studs with a hammer. Any stud that does not show a 360° flash may be repaired by the Contractor by fillet welding the missing flash. Any stud that the Contractor elects not to repair, or any stud that the Contractor has not repaired properly, must be bent to an angle of approximately 15° from its original axis.
Any stud that does not pass the bend test must be replaced. All studs that have been bent and have not failed should not be straightened.
Bearing Adjustment
When steel beams or girders are first landed, and before sole plates are fastened, bearings may be set approximately plumb. After all beams or girders between expansion joints are in place and the overall length has been checked, make temperature corrections in the plumbness of the bearings. The length of bridge from the fixed bearing and the deviation in temperature of the steel from 60° F(16° C ) must be used in calculating the tilt to the bearings when rockers are used.
The coefficient of expansion to multiply with the length and temperature difference is 0.000006 (0.0000117). For example, for a two-span length of 160 feet (49 m) and at 40° F (4° C) for a difference of 20° F degrees (-7° C), the calculation is 160 x 20 x 0.000006 = .0192 feet, or 1/4 inch (49 x 11 x .0000117 = .0060 m or 6 mm) that the rocker should be inclined from the vertical toward the fixed bearing to compensate for the existing temperature.
The same factors must be used to determine the offset in sliding plate bearings.
Adjustments should be made on a cloudy day when a temperature differential in the steel is not caused by the sun’s rays.
A final check of correct bearing adjustment must be made after the deck has been completed.
Elastomeric bearings cannot be adjusted for temperature as there is no way to keep them in a deformed shape. Due to this, if it is necessary to correct for temperature due to excessive deformation or racking of the bearings, the beams will have to be jacked up and the bearings reset when the temperature is close to 60° F.
Documentation Requirements - 513 Structural Steel Members
1. Check fabrication for compliance
a. Pay in accordance with pay weight on IOC from the Office of Material Management
b. TE-24 on file for Structural Members
2. Bolted Splices
a. Insure contractor's compliance with approved erection procedure
b. 50% of holes filled with drift pins and snug tight bolts (25% for each)
c. Furnish calibration of torque wrenches and skidmore device
d. Document that engineer inspected first completed joint and others as necessary
e. Check no fewer than 10% of tightened bolts
3. Welding
a. Welding rods stored in a warm, dry area
b. Inspected for size
c. Document type of welding. (stick welding is pre-qualified all others require Central Office approval)
d. Verify and document welder’s qualifications with approved welders list maintained by the Office of Materials Management